13 透明特效相关的多种模式#
常用模式#
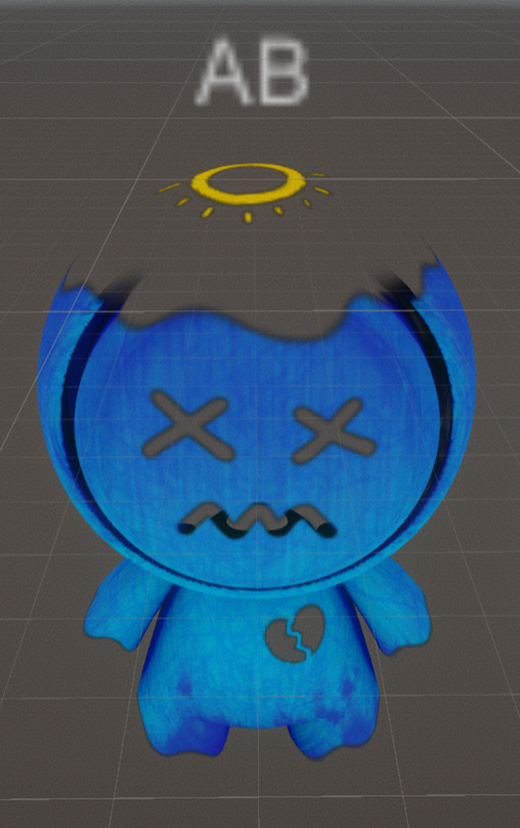
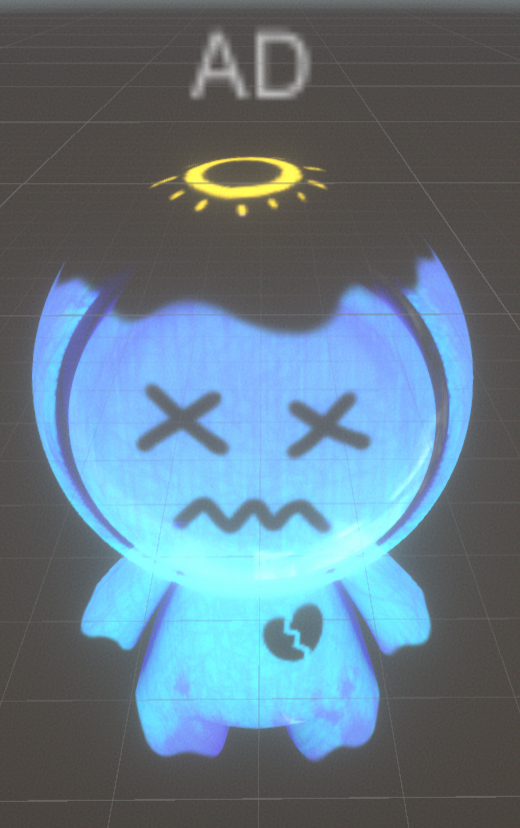
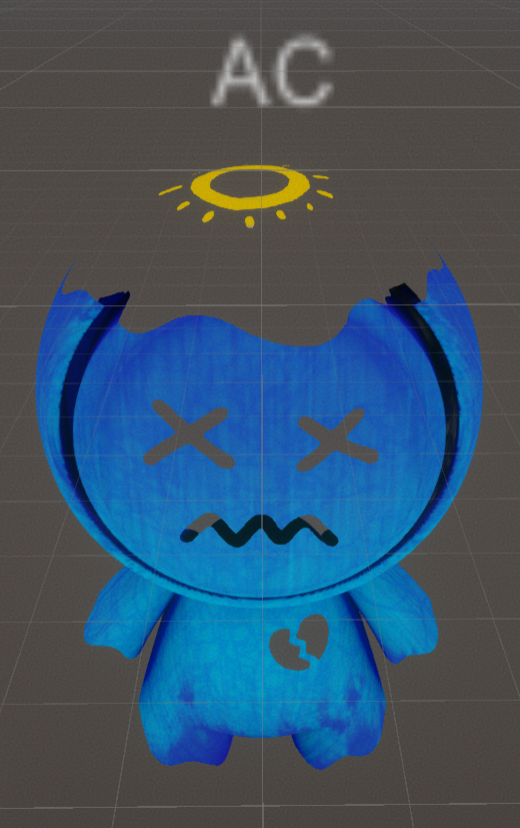
| 混合模式 | 用途 | 优点 | 缺点 |
|---|---|---|---|
| 透混 AB (AlphaBlend) | 复杂轮廓、无明确边缘的物体 半透明物体 一般特效打底 | 移动端性能较好 边缘效果自然 | 有排序问题 |
| 透叠 AD (Additive) | 发光体、辉光表现 特效提亮 | - | 有排序问题 多层叠加易 OverDraw 作为辉光效果,通常可用后处理代替 |
| 透切 AC (AlphaCutOut) | 复杂轮廓、明确边缘 (如树叶、头发、金属镂空) 卡通特效 (配合抗锯齿) | 无排序问题 | 边缘生硬 移动端性能较差 |


自定义模式#
自定义混合公式,灵活实现特殊效果, 需要遵循特定语法
语法#
Src * SrcFactor op Dst * DstFactor
| 元素 | 说明 |
|---|---|
Src | 源,当前 Shader 绘制结果 |
Dst | 目标,当前 Shader 绘制前的背景 |
SrcFactor | 源乘子 |
DstFactor | 目标乘子 |
op | 混合运算符 |
乘子决定相关元素以什么方式参与混合,混合运算符决定混合的形式,详细内容请查阅 Unity 官方文档
代码案例#
//AB案例
Shader "Zhuangdong/AP1/L07/L07_AB" {
    Properties{
        _MainTex ("RGB: 颜色 A: 透贴", 2D) = "white" {}
        _Opacity ("透明度", range(0,1)) = 0.5
    }
    SubShader{
        Tags {
            "Queue" = "Transparent"
            //让透明物体最后渲染,防止出现后面物体消失的现象
            "RenderType" = "Transparent"
            "ForceNoShadowCasting" = "True"//关闭投影
            "IgnoreProject" = "True"//不影响投射器
        }
        Pass {
            Name "FORWARD"
            Tags {
                "LightMode" = "ForwardBase"
            }
            Blend One OneMinusSrcAlpha//声明混合方式
            CGPROGRAM
            #pragma vertex vert
            #pragma fragment frag
            #include "UnityCG.cginc"
            #pragma multi_compile_fwdbase_fullshadows
            #pragma target 3.0
            uniform sampler2D _MainTex; uniform float4 _MainTex_ST;
            uniform half _Opacity;
            struct VertexInput {
                float4 vertex : POSITION;
                float2 uv0 : TEXCOORD0;
            };
            struct VertexOutput {
                float4 pos : SV_POSITION;
                float2 uv0 : TEXCOORD0;
            };
            VertexOutput vert(VertexInput v) {
                VertexOutput o = (VertexOutput)0;
                o.pos = UnityObjectToClipPos(v.vertex);
                o.uv0 = TRANSFORM_TEX(v.uv0, _MainTex);
                return o;
            }
            half4 frag(VertexOutput i) : COLOR{ //固定写法
                half4 var_MainTex = tex2D(_MainTex, i.uv0);
                half3 finalRGB = var_MainTex.rgb;
                half opacity = var_MainTex.a * _Opacity;
                return half4(finalRGB * opacity, opacity);
            }
            ENDCG
        }
    }
    FallBack "Diffuse"
}
//AD案例
//以 AB 案例为模板
...
SubShader{
    ...
    pass{
        ...
        Blend One One
        //只需要把 AB 案例的 BlendMode 修改即可
        ...
    }
    ...
}
//AC案例
//以 AB 案例为模板
...
SubShader{
    Tags{
        "RenderType" = "TransparentCutout"//对应 AC
        "ForceNoShadowCasting" = "True"
        "IgnoreProject" = "True"
    }
    pass{
        ...
        half4 frag(VertexOutput i) : COLOR{
            half4 var_MainTex = tex2D(_MainTex, i.uv0);
            half opacity = var_MainTex.a;
            clip(opacity - _Cutoff);//透明剪切
            return half4(var_MainTex.rgb, 1.0);
        }
    }
    ...
}
//自定义案例
...
Pass {
    Name "FORWARD"
    Tags {
        "LightMode" = "ForwardBase"
    }
    BlendOp [_BlendOp]
    Blend [_BlendSrc] [_BlendDst]
    //在 Tags 后添加公式
...
15 常见问题#
1. 排序问题#
透明物体渲染时,前后关系不明确
解决方法#
- Detach/Attach(DDC软件修改模型顶点顺序)
- ZWrite Off(关闭深度写入)
2. 贴图预乘问题#
有的贴图资产已做预乘 (BaseColor * Alpha),有的没有,混合方式需区分
- AB 模式:预乘用
One OneMinusSrcAlpha,不预乘用SrcAlpha OneMinusSrcAlpha, 或在 frag 做乘法 - AD 模式:预乘可无 A 通道,不预乘需在 frag 做乘法
3. 案例 GhostFlow#
//以 AB 为模板
 Shader "Zhuangdong/AP1/L08/L08_GhostFlow" {
            Properties{
                _MainTex ("RGB: 颜色 A: 透贴", 2D) = "gray" {}
                _Opacity ("透明度", range(0,1)) = 0.5
                _WarpTex ("扭曲图", 2D) = "gray" {}
                _WarpInt ("扭曲强度", range(0, 1)) = 0.5
                _NoiseInt("噪声强度", range(0, 5)) = 0.5
                _FlowSpeed ("流动速度", range(0, 10)) = 5
            }
            SubShader{
                ...
                Pass {
                    ...
                    Blend One OneMinusSrcAlpha
                    ...
                    struct VertexInput {
                        float4 vertex : POSITION;
                        float2 uv : TEXCOORD0;
                    };
                    struct VertexOutput {
                        float4 pos : SV_POSITION;
                        float2 uv0 : TEXCOORD0;
                        float2 uv1 : TEXCOORD1;
                    };
                    VertexOutput vert(VertexInput v) {
                        VertexOutput o = (VertexOutput)0;
                        o.pos = UnityObjectToClipPos(v.vertex);
                        o.uv0 = v.uv;
                        o.uv1 = TRANSFORM_TEX(v.uv, _WarpTex); //开启 Tiling
                        o.uv1.y = o.uv1.y + frac(_Time.x * _FlowSpeed);//启动 V 轴流动
                        return o;
                    }
                    half4 frag(VertexOutput i) : COLOR{
                        half3 var_WarpTex = tex2D(_WarpTex, i.uv1);
                        half2 uvBias = (var_WarpTex.rg - 0.5) * _WarpInt;
                        half2 uv0 = i.uv0 + uvBias;
                        half4 var_MainTex = tex2D(_MainTex, uv0);

                        half3 finalRGB = var_MainTex.rgb;
                        half noise = lerp(1.0, var_WarpTex.b * 2.0, _NoiseInt);
                        noise = max(0.0, noise);
                        half opacity = var_MainTex.a * _Opacity * noise;
                        return half4(finalRGB * opacity, opacity);
                    }
                    ENDCG
                }
            }
            FallBack "Diffuse"
        }

核心思路#
通过扰动贴图和流动速度参数,实现透明特效的动态变化
o.uv1.y = o.uv1.y + frac(_Time.x * _FlowSpeed); // V 轴流动
half opacity = var_MainTex.a * _Opacity * noise;
| 参数/函数 | 说明 |
|---|---|
_Time | 随时间递增的参数,有 x,y,z,w 四个分量,代表不同速度挡位 |
_FlowSpeed | 控制流动速度 |
frac | 取余,这里是为了防止_Time 无限增长导致出现摩尔纹 |
noise = lerp(1.0, var_WarpTex.b * 2.0, _NoiseInt) | 保证明度不变暗 |
_NoiseInt | 此参数数值越高,noise 越清晰,超过 1 时,noise 对比度加强 |
max(0.0, noise) | 防止出现负值导致颜色异常 |
4. 案例 GhostWarp#
//以 GhostFlow 为模板
...
half3 var_WarpTex = tex2D(_WarpTex, i.uv1);
half2 uvBias = (var_WarpTex.rg - 0.5) * _WarpInt;
half2 uv0 = i.uv0 + uvBias;
half4 var_MainTex = tex2D(_MainTex, uv0);
...
原理#
WarpTex 的 rg 通道控制 UV 扰动方向,-0.5 保证扰动均匀分布
注意#
WarpInt 过大时,扰动会很突兀.这是明暗两边灰度值差异过大导致的

14, 16 火焰与水波纹特效案例#
火焰特效#
关键代码#
//以 GhostFlow 为模板
Shader "Zhuangdong/AP1/L09/L09_Fire" {
            Properties{
                _Mask ("R:外焰 G:内焰 B:透贴", 2D) = "blue" {}
                _Noise ("R:Noise1 G:Noise2", 2D) = "gray" {}
                _Noise1Params ("Noise1 x:大小 y:流速 z:强度", vector) = (1.0, 0.2, 0.2, 1.0)
                _Noise2Params ("Noise2 x:大小 y:流速 z:强度", vector) = (1.0, 0.2, 0.2, 1.0)
                _color1 ("外焰颜色", Color) = (1,1,1,1)
                _color2 ("内焰颜色", Color) = (1,1,1,1)
            }
            SubShader{
                ...
                Pass {
                    ...
                    Blend One OneMinusSrcAlpha
                    ...

                    struct VertexInput {
                        float4 vertex : POSITION;
                        float2 uv : TEXCOORD0;
                    };
                    struct VertexOutput {
                        float4 pos : SV_POSITION;
                        float2 uv0 : TEXCOORD0;
                        float2 uv1 : TEXCOORD1;
                        float2 uv2 : TEXCOORD2;
                    };
                    VertexOutput vert(VertexInput v) {
                        VertexOutput o = (VertexOutput)0;
                        o.pos = UnityObjectToClipPos(v.vertex);
                        o.uv0 = v.uv;
                        o.uv1 = v.uv * _Noise1Params.x - float2(0.0, frac(_Time.x * _Noise1Params.y));
                        o.uv2 = v.uv * _Noise2Params.x - float2(0.0, frac(_Time.x * _Noise2Params.y));
                        return o;
                    }
                    half4 frag(VertexOutput i) : COLOR{
                        half warpMask = tex2D(_Mask, i.uv0).b;
                        half var_Noise1 = tex2D(_Noise, i.uv1).r;
                        half var_Noise2 = tex2D(_Noise, i.uv2).g;
                        half noise = var_Noise1 * _Noise1Params.z +
                                     var_Noise2 * _Noise2Params.z;
                        float2 warpUV = i.uv0 - float2(0.0, noise) * warpMask;
                        half3 var_Mask = tex2D(_Mask, warpUV);
                        half3 finalRGB = _color1 * var_Mask.r + _color2 * var_Mask.g;
                        half opacity = var_Mask.r + var_Mask.g;
                        return half4(finalRGB, opacity);
                    }
                    ENDCG
                }
            }
            FallBack "Diffuse"
        }
原理#
两层 Noise 扰动叠加,控制火焰动态,同时通过 mask 自定义内焰外焰的颜色
关键点#
| 参数/表达式 | 说明 |
|---|---|
_NoiseParams.x | 控制 Tiling |
_NoiseParams.y | 控制速度 |
_NoiseParams.z | 控制扰动强度 |
float2(0,0, frac()) | 如果 v.uv - frac() 的话,纹理会往对角线方向流动,因为 frac 会自动识别为 float2(frac(), frac()) |

水波纹特效#
关键代码#
//以 Fire 为模板
Shader "Zhuangdong/AP1/L09/L09_Water" {
    Properties{
        _MainTex ("颜色贴图", 2D) = "white" {}
        _WarpTex ("扰动图", 2D) = "gray" {}
        _Speed ("x: 流速 x y: 流速 y", vector) = (1.0, 1.0, 0.5, 1.0)
        _Warp1Params ("Noise1 x: 大小 y: 流速 x z: 流速 y w: 强度", vector) = (1.0, 0.2, 0.2, 1.0)
        _Warp2Params ("Noise2 x: 大小 y: 流速 x z: 流速 y w: 强度", vector) = (1.0, 0.2, 0.2, 1.0)
    }
    SubShader{
        Tags {
            "RenderType" = "Opaque"
        }
        Pass {
            Name "FORWARD"
            Tags {
                "LightMode" = "ForwardBase"
            }
            ...
            VertexOutput vert(VertexInput v) {
                VertexOutput o = (VertexOutput)0;
                o.pos = UnityObjectToClipPos(v.vertex);
                o.uv0 = v.uv - frac(_Time.x * _Speed);//主贴图流动
                o.uv1 = v.uv * _Warp1Params.x - frac(_Time.x * _Warp1Params.yz);//扰动贴图 1 流动
                o.uv2 = v.uv * _Warp2Params.x - frac(_Time.x * _Warp2Params.yz);//扰动贴图 2 流动
                return o;
            }
            float4 frag(VertexOutput i) : COLOR{
                half3 var_Warp1 = tex2D(_WarpTex, i.uv1).rgb;//扰动值 1
                half3 var_Warp2 = tex2D(_WarpTex, i.uv2).rgb;//扰动值 2
                half2 warp = (var_Warp1.xy - 0.5) * _Warp1Params.w +
                            (var_Warp2.xy - 0.5) * _Warp2Params.w;
                float2 warpUV = i.uv0 + warp;//添加扰动值
                half4 var_MainTex = tex2D(_MainTex, warpUV);
                return float4(var_MainTex.xyz, 1.0);
            }
            ENDCG
        }
    }
    FallBack "Diffuse"
}
原理#
主纹理 UV 加上两层扰动 Noise,实现水面波动效果

17 ScreenUV&ScreenWarp#
ScreenUV#
通过屏幕空间 UV 采样,实现纹理随摄像机距离变化和流动的特效.
关键在于用视空间坐标矫正畸变,并叠加流动效果.
关键代码#
//以 AB 为模板
...
VertexOutput vert(VertexInput v) {
    VertexOutput o = (VertexOutput)0;
        o.pos = UnityObjectToClipPos(v.vertex);
        o.uv = v.uv;
        float3 posVS = UnityObjectToViewPos(v.vertex).xyz;//顶点位置 OS 转 VS
        o.screenUV = posVS.xy / posVS.z;//VS 空间畸变矫正
        float originDist = UnityObjectToViewPos(float3(0.0, 0.0, 0.0)).z;//原点位置
        o.screenUV *= originDist; //o.screenUV * originDist
        o.screenUV = o.screenUV * _ScreenTex_ST.xy - frac(_Time.x * _ScreenTex_ST.zw);//增加 tiling 和 offset 和 流动
    return o;
}
half4 frag(VertexOutput i) : COLOR{
    half4 var_MainTex = tex2D(_MainTex, i.uv);
    half var_ScreenTex = tex2D(_ScreenTex, i.screenUV).r;
    half3 finalRGB = var_MainTex.rgb;
    half opacity = var_MainTex.a * _Opacity * var_ScreenTex;
    return half4(finalRGB * opacity, opacity);
}
...
要点#
o.screenUV视空间矫正 UV,防止深度畸变originDist通过原点距离控制纹理缩放.time叠加流动效果.

ScreenWarp#
利用 GrabPass 获取背景,通过主纹理的某个通道扰动屏幕 UV,实现半透明区域的背景扭曲 (类似 PS 正片叠底)
关键代码#
Shader "Zhuangdong/AP1/L10/L10_ScreenWarp" {
    Properties{
        _MainTex ("RGB: 颜色 A: 透贴", 2D) = "white" {}
        _Opacity ("透明度", range(0,1)) = 0.5
        _WarpMidVal ("扭曲中间值", range(0, 1)) = 0.5
        _WarpInt ("扭曲强度", range(0, 3)) = 0.2
    }
    SubShader{
        ...
        GrabPass{
            "_BGTex"
        }
        ...
        uniform sampler2D _BGTex;
        ...
            struct VertexOutput {
                float4 pos : SV_POSITION;
                float2 uv0 : TEXCOORD0;
                float4 grabPos : TEXCOORD1;//背景采样坐标
            };
            VertexOutput vert(VertexInput v) {
                VertexOutput o = (VertexOutput)0;
                o.pos = UnityObjectToClipPos(v.vertex);
                o.uv0 = TRANSFORM_TEX(v.uv0, _MainTex);
                o.grabPos = ComputeGrabScreenPos(o.pos);//针对 grabpass 的背景纹理采样坐标
                return o;
            }
            half4 frag(VertexOutput i) : COLOR{
                half4 var_MainTex = tex2D(_MainTex, i.uv0);
                i.grabPos.xy += (var_MainTex.b - _WarpMidVal) * _WarpInt * _Opacity;
                half3 var_BGTex = tex2Dproj(_BGTex, i.grabPos);
                //tex2Dproj 是专门采样这类贴图的指令
                half3 finalRGB = var_MainTex.rgb * var_BGTex;
                half opacity = var_MainTex.a * _Opacity;
                return half4(finalRGB * opacity, opacity);
        ...
要点#
GrabPass获取背景并保存在 BGTex 中WarpMidVal调整 UV 采样位置_Opacity透明度和 i.grabPos 绑定,透明度越低,扭曲越明显
同类方法#
GrabPass: 适合高质量但性能开销大CommandBuffer: 前 Srp 时代管线自定义方法Lwrp/Urp: 后 Srp 时代管线自定义方法 (推荐)

18. 序列帧动画 (Sequence)#
序列帧动画原理#
在特效制作中,常用一张包含多帧的序列帧贴图,每一帧代表动画的一个状态.通过切换 UV 采样区域,实现动画播放效果.
- 案例贴图为 3 行 4 列,每帧依次排列.
- 特效层悬浮于物体表面 (通过顶点沿法线方向挤出).
- UV 起点为左上,需调整初始采样区域.

关键代码#
//在 AB 案例基础上添加一个 pass
...
pass{
Name "FORWARD"
Tags {
    "LightMode" = "ForwardBase"
}
Blend One One
...
VertexOutput vert(VertexInput v) {
    VertexOutput o = (VertexOutput)0;
        //顶点沿法线方向挤出
        v.vertex.xyz += v.normal * 0.01;
        o.pos = UnityObjectToClipPos(v.vertex);
        o.uv = TRANSFORM_TEX(v.uv, _Sequence);
        //计算当前帧索引
        float id = floor(_Time.z * _Speed);
        float idV = floor(id / _ColCount);
        float idU = id - idV * _ColCount;
        float stepU = 1.0 / _ColCount;
        float stepV = 1.0 / _RowCount;
        //uv 缩放并调整起点到左上
        float2 initUV = o.uv * float2(stepU, stepV) + float2(0.0, stepV * (_RowCount -1));
        o.uv = initUV + float2(idU * stepU, -idV * stepV);
    return o;
}
half4 frag(VertexOutput i) : COLOR{
    half4 var_Sequence = tex2D(_Sequence, i.uv);
    half3 finalRGB = var_Sequence.rgb;
    half opacity = var_Sequence.a;
    return half4(finalRGB * opacity, opacity);
}
ENDCG
...
要点总结#
floor向下取整,比如 1.9 输出 1id横向每次移动1/_ColCountidV = floor(id / _ColCount)当 id 为列数的整数倍时,idV 增加 1idU = id - idV * _ColCount纵向每满一行移动1/_RowCount, 同时 idU 清零float2(idU * stepU, -idV * stepV)每次移动1/_ColCount单位,当移动次数等于_ColCount时,idU清零回到最左边,同时纵向移动1/_RowCount单位
注:特效算法尽量简单,避免 overdraw.
极坐标动画 (PolarCoord)#
极坐标变换可实现径向流动、扫描等特效.通过将 UV 从笛卡尔坐标系转换为极坐标,并叠加时间流动,实现特殊动画效果.
极坐标#
假设一个 x 轴,原点到点 M 连接,OM 和 x 轴夹角为θ,OM 长度为 P, 极坐标为 (θ, P)

关键代码#
half4 frag(VertexOutput i) : COLOR {
    i.uv = i.uv - float2(0.5, 0.5);
    float theta = atan2(i.uv.y, i.uv.x);
    theta = theta / 3.1415926 * 0.5 + 0.5;
    float p = length(i.uv) + frac(_Time.x * 3);
    i.uv = float2(theta, p);

    half4 var_MainTex = tex2D(_MainTex, i.uv);
    half3 finalRGB = (1 - var_MainTex.rgb);
    half opacity = (1 - var_MainTex.r) * _Opacity * i.color.r;
    return half4(finalRGB * opacity, opacity);
}

要点总结#
atan2计算角度θ, 结果为 (-Π, Π), 归一化到[0,1].

length计算点 (x, y) 到原点的距离,由于原点从 (0,0) 偏移到了 (0.5, 0.5), 输出的结果会是这样的

float2(theta, p)UV 映射到极坐标,实现径向动画.i.color顶点色用于柔化边缘.
19. 顶点动画 (Vertex Animation)#
19.1 平移 (Translation)#
通过正弦函数让顶点在 Y 轴方向周期性移动,实现整体上下浮动效果.
关键代码#
//以 AB 为模板
...
#define TWO_PI 6.283185

void Translation (inout float3 vertex) {
    vertex.y += _MoveRange * sin(frac(_Time.z * _MoveSpeed) * TWO_PI);
}

VertexOutput vert(VertexInput v) {
    VertexOutput o = (VertexOutput)0;
    Translation(v.vertex.xyz);
    o.pos = UnityObjectToClipPos(v.vertex);
    o.uv0 = v.uv0;
    return o;
}

要点#
fracFractionalPrat, 取小数部分,保证时间参数在[0,1]循环,防止溢出.sinsin(0, 2Π) 是一个从 0 到 1 再到 0 的周期运动.
19.2 缩放 (Scale)#
所有顶点按同一比例缩放.
关键代码#
//以 AB 为模板
void Scaling (inout float3 vertex) {
    vertex.xyz *= 1.0 + _ScaleRange * sin(frac(_Time.z * _ScaleSpeed) * TWO_PI);
}

VertexOutput vert(VertexInput v) {
    VertexOutput o = (VertexOutput)0;
    Scaling(v.vertex.xyz);
    o.pos = UnityObjectToClipPos(v.vertex);
    o.uv0 = TRANSFORM_TEX(v.uv0, _MainTex);
    return o;
}

要点#
保证缩放值大于 0,避免反向缩放.
19.3 旋转 (Rotation)#
顶点绕 Y 轴周期性旋转,实现摇头、摆动等效果.
关键代码#
//以 AB 为模板
void Rotation (inout float3 vertex) {
    float angleY = _RotateRange * sin(frac(_Time.z * _Rotatepeed) * TWO_PI);
    float radY = radians(angleY);
    float sinY, cosY = 0;
    sincos(radY, sinY, cosY);
    vertex.xz = float2(
        vertex.x * cosY - vertex.z * sinY,
        vertex.x * sinY + vertex.z * cosY
    );
}

要点#
radians角度转弧度,弧度写法提升性能sincos(raY, sinY, cosY)等价于 sinY = sin(radY), cosY = cos(radY), 这种写法提高性能.vertex.xz旋转矩阵 M (x * cosθ - y * sinθ, x * sinθ + y * cosθ)
19.4 复合动画 (AnimationGhost)#
将缩放、平移、旋转等多种动画结合,配合顶点色实现复杂运动 (如幽灵、天使圈等).
关键代码#
...
//以 AB 为模板
void AnimGhost (inout float3 vertex, inout float3 color){
    // 天使圈缩放
    float scale = _ScaleParams.x * color.g * sin(frac(_Time.z * _ScaleParams.y) * TWO_PI);
    vertex.xyz *= 1.0 + scale;
    vertex.y -= _ScaleParams.z * -scale;
    // 幽灵摆动
    float swingX = _SwingXparams.x * sin(frac(_Time.z * _SwingXparams.y + vertex.y * _SwingXparams.z) * TWO_PI);
    float swingZ = _SwingZparams.x * sin(frac(_Time.z * _SwingZparams.y + vertex.y * _SwingZparams.z) * TWO_PI);
    vertex.xz += float2(swingX, swingZ) * color.r;
    // 幽灵摇头
    float radY = radians(_ShakeYparams.x) * (1.0 - color.r) * sin(frac(_Time.z * _ShakeYparams.y - color.g * _ShakeYparams.z) * TWO_PI);
    float sinY, cosY = 0;
    sincos(radY, sinY, cosY);
    vertex.xz = float2(
        vertex.x * cosY - vertex.z * sinY,
        vertex.x * sinY + vertex.z * cosY
    );
    // 幽灵起伏
    float swingY = _SwingYparams.x * sin(frac(_Time.z * _SwingYparams.y - color.g * _SwingYparams.z) * TWO_PI);
    vertex.y += swingY;
    // 处理顶点色
    float lightness = 1.0 + color.g * 1.0 + scale * 2.0;
    color = float3(lightness, lightness, lightness);
}
...

要点#
- 使用顶点色 R、G 通道分别控制不同动画区域.
vertex.y -= _ScaleParams.z * -scale缩放动画是以模型原点为中心缩放的,控制 y 轴缩放幅度,避免天使圈离开原地vertex.y * _SwingXparams.zsin 的的结果受 vertex.y 影响,实现 S 形摆动_ShakeYoarams.z_SwingYparams.z让天使环和其他部分的动画,产生时间上的滞后lightness光环亮度随 time 变化
20. 时钟动画 (ClockAnim)#
20.1 时钟指针动画#
通过C#脚本获取系统时间,驱动Shader中时针、分针、秒针的旋转,实现真实时钟动画.
关键代码#
...
void RotateZwithOffset(float angle, float offset, float mask, inout float3 vertex){
    vertex.y -= offset * mask;
    float radZ = radians(angle * mask);
    float sinZ, cosZ = 0;
    sincos(radZ, sinZ, cosZ);
    vertex.xy = float2(
        vertex.x * cosZ - vertex.y * sinZ,
        vertex.x * sinZ + vertex.y * cosZ
    );
    vertex.y += offset * mask;
}

void ClockAnim(float3 color, inout float3 vertex) {
    RotateZwithOffset(_HourHandAngle, _RotateOffset, color.r, vertex);
    RotateZwithOffset(_MinuteHandAngle, _RotateOffset, color.g, vertex);
    RotateZwithOffset(_SecondHandAngle, _RotateOffset, color.b, vertex);
}
VertexOutput vert(VertexInput v) {
    VertexOutput o = (VertexOutput)0;
        ClockAnim(v.color.rgb, v.vertex.xyz);
...

要点#
angle代表每个时间单位的旋转角度offset偏移旋转中心.初始中心在模型原点,需要调整
C#脚本绑定系统时间#
using System;
using UnityEngine;

public class HelloWorld : MonoBehaviour
{
    // --------- Public -------
    public Material clockMat;
    // --------- private --------
    private bool valid;
    private int hourAnglePropID;
    private int minuteAnglePropID;
    private int secondAnglePropID;

    // Start is called before the first frame update
    void Start()
    {
        if(clockMat == null) return;
        hourAnglePropID = Shader.PropertyToID("_HourHandAngle");
        minuteAnglePropID = Shader.PropertyToID("_MinuteHandAngle");
        secondAnglePropID = Shader.PropertyToID("_SecondHandAngle");
        if(clockMat.HasProperty(hourAnglePropID) && clockMat.HasProperty(minuteAnglePropID) && clockMat.HasProperty(secondAnglePropID))
            valid = true;

        Debug.Log("hourAnglePropID" + hourAnglePropID);
        Debug.Log("minuteAnglePropID" + minuteAnglePropID);
        Debug.Log("secondAnglePropID" + secondAnglePropID);
        Debug.Log(valid);
    }

    // Update is called once per frame
    void Update()
    {
        if(!valid) return;
        int second = DateTime.Now.Second;
        float secondAngle = second /60.0f * 360.0f;
        clockMat.SetFloat(secondAnglePropID, secondAngle);

        int minute = DateTime.Now.Minute;
        float minuteAngle = minute /60.0f * 360.0f;
        clockMat.SetFloat(minuteAnglePropID, minuteAngle);

        int hour = DateTime.Now.Hour;
        float hourAngle = (hour % 12) / 12.0f * 360.0f + minuteAngle / 360.0f * 30.0f;
        clockMat.SetFloat(hourAnglePropID, hourAngle);
    }
}
要点#
继承编程术语,可以让 class 直接使用其他 class 现存的方法clockMat模型的材质,继承自MonoBehaviour的 class, 其脚本被允许附着在 GameObject 上,并获取该 GameObject 的材质%取余,保证 hour 超过 12 时归 0余数 = 被除数 - (除数 * 整数商), 比如 7/3 的余数 = 7 - (3 * 2) = 1
20.2 阴影投影 Pass#
关键代码#
Pass {
    Name "ShadowCaster"
    Tags { "LightMode" = "ShadowCaster" }
    CGPROGRAM
    #pragma vertex vert
    #pragma fragment frag
    #pragma multi_compile_shadowcaster
    #include "UnityCG.cginc"

    uniform float _HourHandAngle, _MinuteHandAngle, _SecondHandAngle, _RotateOffset;

    struct appdata {
        float4 vertex : POSITION;
        float3 normal : NORMAL;
        float3 color : COLOR;
    };

    struct v2f {
        V2F_SHADOW_CASTER;
    };

    void RotateZwithOffset(float angle, float offset, float mask, inout float3 vertex){
        vertex.y -= offset * mask;
        float radZ = radians(angle * mask);
        float sinZ, cosZ = 0;
        sincos(radZ, sinZ, cosZ);
        vertex.xy = float2(
            vertex.x * cosZ - vertex.y * sinZ,
            vertex.x * sinZ + vertex.y * cosZ
        );
        vertex.y += offset * mask;
    }

    void ClockAnim(float3 color, inout float3 vertex) {
        RotateZwithOffset(_HourHandAngle, _RotateOffset, color.r, vertex);
        RotateZwithOffset(_MinuteHandAngle, _RotateOffset, color.g, vertex);
        RotateZwithOffset(_SecondHandAngle, _RotateOffset, color.b, vertex);
    }

    v2f vert(appdata v) {
        v2f o;
        ClockAnim(v.color.rgb, v.vertex.xyz);
        // 关键修复:计算带法线偏移的阴影坐标
        float3 posWS = mul(unity_ObjectToWorld, v.vertex).xyz;//动画后的顶点转世界空间
        float3 normalWS = UnityObjectToWorldNormal(v.normal);//法线转世界空间
        o.pos = UnityClipSpaceShadowCasterPos(posWS, normalWS);
        TRANSFER_SHADOW_CASTER_NORMALOFFSET(o)
        return o;
    }

    float4 frag(v2f i) : SV_Target {
        SHADOW_CASTER_FRAGMENT(i)
    }
    ENDCG
}
要点#
ShadowCaster处理投影 Pass 的固定命名,以及 LightMode 的固定模式UnityClipSpaceShadowCasterPos(posWS, normalWS)法线偏移修正,获得动画前的法线和动画后的顶点,来计算动画后的法线方向,最终输出动画后的顶点位置和修正后的法线在光源视锥体下的裁剪空间坐标V2F_SHADOW_CASTERUnity 内置宏,等价于:- float4 pos : SV_POSITION
- float3 vec : TEXCOORD0 (只在有点光源时使用)
TRANSFER_SHADOW_CASTER_NORMALOFFSET(o)输入 posWS, normalWS, 输出V2F_SHADOW_CASTERSHADOW_CASTER_FRAGMENT(i)输入 pos, 根据光源类型处理投影
注:只需要 ShadowCaster, V2F_SHADOW_CASTER, TRANSFER_SHADOW_CASTER_NORMALOFFSET(o), SHADOW_CASTER_FRAGMENT(i) 4 个要素就能获得一个功能完整的阴影投射 Pass
21. 特效消融动画案例#
21.1 灰度图与噪声控制消融#
通过多通道灰度图、噪声图、顶点色,实现网格消失、随机性、发光等复杂消融特效.

关键结构体与函数#
struct VertexInput {
    float4 vertex  : POSITION;
    float2 uv0     : TEXCOORD0;
    float2 uv1     : TEXCOORD1;
    float4 normal  : NORMAL;
    float4 tangent : TANGENT;
    float4 color : COLOR;
};
struct VertexOutput {
    float4 pos : SV_POSITION;
    float2 uv0 : TEXCOORD0;
    float2 uv1 : TEXCOORD1;
    float4 posWS : TEXCOORD2;
    float3 nDirWS : TEXCOORD3;
    float3 tDirWS : TEXCOORD4;
    float3 bDirWS : TEXCOORD5;
    float4 effectMask : TEXCOORD6;
    LIGHTING_COORDS(7,8)
};

float4 CyberpunkAnim(float noise, float mask, float3 normal, inout float3 vertex){
    float baseMask = abs(frac(vertex.y * _EffParams.x - _Time.x * _EffParams.y) -0.5) * 2.0;
    baseMask = min(1.0, baseMask * 2.0);
    baseMask += (noise - 0.5) * _EffParams.z;
    float4 effectMask = float4(0.0, 0.0, 0.0, 0.0);
    effectMask.x = smoothstep(0.0, 0.9, baseMask);
    effectMask.y = smoothstep(0.2, 0.7, baseMask);
    effectMask.z = smoothstep(0.4, 0.5, baseMask);
    effectMask.w = mask;
    vertex.xz += normal.xz * (1.0 - effectMask.y) * _EffParams.w * mask;
    return effectMask;
}
顶点着色器#
VertexOutput vert(VertexInput v) {
    float noise = tex2Dlod(_EffectMap02, float4(v.uv1, 0.0, 0.0)).r;
    VertexOutput o = (VertexOutput)0;
    o.effectMask = CyberpunkAnim(noise, v.color, v.normal.xyz, v.vertex.xyz);
    o.pos = UnityObjectToClipPos(v.vertex);
    o.uv0 = v.uv0;
    o.uv1 = v.uv1;
    o.posWS = mul(unity_ObjectToWorld, v.vertex);
    o.nDirWS = UnityObjectToWorldNormal(v.normal);
    o.tDirWS = normalize( mul( unity_ObjectToWorld, float4( v.tangent.xyz, 0.0 ) ).xyz );
    o.bDirWS = normalize(cross(o.nDirWS, o.tDirWS) * v.tangent.w);
    TRANSFER_VERTEX_TO_FRAGMENT(o)
    return o;
}
片段着色器#
float4 frag(VertexOutput i) : COLOR{
// ...(向量、光照、采样等略)...
//光照模型
float3 baseCol = var_MainTex.rgb * _BaseColor;
float  Lambert = max(0.0, nDotl);//lambert
float specCol = var_SpecTex.rgb;
float specpow = lerp(1, _SpecularPow_Value, var_SpecTex.a);
float   Phong = pow(max(0.0, vDotr), _SpecularPow_Value);
float shadow = LIGHT_ATTENUATION(i);
float3 dirlighting = (baseCol * Lambert + specCol * Phong) * _LightColor0 * shadow;
float3 EnvCol = TriColAmbient(nDirWS, _TopCol, _MidCol, _BotCol);
float fresnel = pow(1.0 - ndotv, _FresnelPow);
float occlusion = var_MainTex.a;
float3 envLighting = (baseCol * EnvCol * _EnvDiffInt + var_Cubemap * fresnel* _EnvSpecint * var_SpecTex.a) * occlusion;
//自发光
float3 emission = var_EmitTex * _EmitInt;

float3 _EffectMap01_var = tex2D(_EffectMap01, i.uv1).xyz;
float meshMask = _EffectMap01_var.x;
float faceRandomMask = max(0.001, _EffectMap01_var.y);
float faceSlopMask = max(0.001, _EffectMap01_var.z);

float smallMask = i.effectMask.x;
float midMask = i.effectMask.y;
float bigMask = i.effectMask.z;
float baseMask = i.effectMask.w;

float midOpacity = saturate(floor(min(faceRandomMask, 0.999999) + midMask));
float bigOpacity = saturate(floor(min(faceSlopMask, 0.999999) + bigMask));
float opacity = lerp(1.0, min(bigOpacity, midOpacity), baseMask);

float meshEmitInt = (bigMask - smallMask) * meshMask;//只在半透明的区域有发光效果
meshEmitInt = meshEmitInt * meshEmitInt * 2.0;//进行固定值的 power,让发光区域缩小
emission += _EffCol * meshEmitInt * baseMask;

float3 FinalColor = dirlighting + envLighting + emission;
return float4(FinalColor * opacity, opacity);
}
要点#
EffMap01- R - WireframeMap 记录模型线框
- G - RandomGrayScale 记录基于面的随机灰度图
- B - DisappearanceGrayscale 记录基于面的统一深度图
EffMap02- 3DPerlinNoise
DisappearanceGrayscale

RandomGrayScale

贴图制作与合并

mask顶点色,让动画只作用于人物baseMask = abs(frac(vertex.y * _EffParams.x - _Time.x * _EffParams.y) -0.5) * 2.0;frac(vertex.y)只取小数,视觉表现为贴图 Gradient Linear 1EffectParams.x控制 Gradient Linear 1 TilingEffectParams.y控制动画速度和方向abs(frac() -0.5) * 2.0abs 取绝对值,最终结果将 Gradient Linear 1 转变成 Gradient Linear 3
baseMask = min()增加取值为 1 的范围baseMask += (noise - 0.5) * _EffParams.z;使 baseMask 取值非 1 的区域产生变化,_EffParams.z控制变化强度smoothstep对指定区域进行波形调整vertex.xz +=对透明部分进行动画,EffParams.w控制动画强度floor小于 1 的取 0, 大于 1 的取 1saturate限定值域为 (0, 1)meshEmitInt * meshEmitInt等价于 Power = value^2faceRandomMask = max(0.001, _EffectMap01_var.y)防止出现负值,负值会导致显示错误
